YU Yureka Plus is now available with Pure Android on Amazon

YU Yureka Plus (YU5510A) relaunched with Pure Android

Yu Yureka Plus Pure Android
YU Yureka Plus with Pure Android
YU has relaunched Yureka Plus with pure Android on Amazon. Yureka Plus which itself was a successor to Yureka the first YU device. Yureka Plus was made available first in July with modified specs but with Cyanogen OS inside. The move seems to negate the fact that YU devices were focused on customization which comes with Cyanogen. However it shouldn't be surprising given the fact that YU recently launched Yunique with pure Android too with an option to run Cyanogen OS 12.1.

Specs wise nothing has changed it comes with Snapdragon 615 with 2 GB of RAM and 16 GB of mass storage with 5.5 inch FHD screen. There's a 13 MP rear camera with 5 MP front cam. It is powered by 2,500 mAh battery. It comes with 4G connectivity.
The device currently runs on Android Kitkat 4.4.4 which can be upgraded to Android Lollipop 5.0.2.

Read: YU Yureka Plus complete specifications.

It is also worth noting that all the offline 825+ Authorized Service Centres in 600+ cities will be available for Yureka Plus.
Buy YU Yureka Plus Pure Android on Amazon


source

[MT6572] [4.4.2]Stay OS V2 For Okapia Easy

Rom Name:Stay OS V2 

Device- Okapia Easy


FEATURES AVAILABLE

- Navigation Bar
- enable / Disable Navbar
High -Set navbar
- Statusbar
- enable / Disabling the operator's name
- Moves Clock on the right or left
Displays seconds on the clock
Displays the name of the day on the clock
- Setting Color hour
- Battery Icon
Colors on the battery icon
- enable / Disable the battery icon
- enable / Disabling the percentage of battery level
- Monitor Internet data
- Set Color monitor Data
- Setting Dynamic color
- Gesture
- Features Gestures anywhere
- Application Circular
- level Visibility
- size Quick keys
- Recents Panel
- enable / Disable button deletion
- enable / Disabling of the memory
- the Location deletion button (right or left)
- Screen Notifications
- Notification Weather
- This Setting fast
- Selection Lot and location shortcut
- Press Long on the icon to enter the settings
- as Occupying music with a single click
- Record Sound and the screen easily
- Maximize RAM used with a single click
- Slider Screen brightness

Lock screen

- change Background image
- Animated
- Animated On the keyboard
- Animated To scroll the screen
- Animated System
- Animated Toast

Introducing new features and applications

- Colors Dynamically set colors at certain hours
- Music
- Video
- Voice recorder
- Torch
- Calendar
- File Manager 
- AND MUCH MORE
NSTRUCTION TO FLASH ROM-

1.You must have a custom recovery on Okapia easy

2.If you have already flashed custom recovery, then only proceed

3.Wipe advance->dalvik cache

4.Flash ROM from sdcard

5.Reboot and enjoy

Screen shot:
http://forum.xda-developers.com/android/development/mt6572-stay-os-v2-okapia-easy-t3211282

Special Thanks To :

==>Stay OS Team

=> Nayeem Hossen (Me) For Porting This ROM

==>Mousumi For helping me

Download Link:

https://drive.google.com/file/d/0B5FI_PeZ3xaEdXdOQUttcWUzY28/view

Redesign AOSP with WanamKit

Better known for customing TouchWiz, Wanam Kit also Works With Vanilla Android too


There are countless Android ROMs out there, but unless you build the ROM yourself, chances are there are always going to be one or two things you would like to change. Wanam Kit originally found fame as a means to de-bloat Samsung’s TouchWiz user interface, which was notorious for its excessive bloatware until the Galaxy’s S6 feature cull. However, Wanam Kit also works with stock ROMs as the Xposed module lets you make a wide range of tweaks to any ROM based on the Android Open Source Project (AOSP). These customization include visual changes such as replacing the standard battery icon, to more functional changes such as disabling lollipop’s new heads-up style notification system. Once you’ve installed Wanam Kit, you can make your changes by exploring the app’s various menus and then disabling or enabling the different options as desired. Before any of these changes become active, you need to reboot your device, so the only downside is that if you want to experiment with a few different changes then you may need to reboot several times before you’re happy with the end result. This module requires root access and the Xposed framework. If you haven’t installed Xposed, Lollipop users can find the necessary files and instructions at the XDA Developer thread goo.gl/DFXwGg. If you’re running an earlier version of Android, you can install the Xposed framework via an in-app updater, available from goo.gl/PAGTpi.

Steps:-


  • Activate Wanam Kit

Download Wanam Kit (Xposed) from the Google Play store. Open your Xposed Installer, tap Modules and make sure that Wanam Kit is selected. To activate this module, reboot your device. Then open your Wanam app. At this point, you’ll see the main Wanam menu.


  • Customizable status bar
Select Status bar. In this section, you can customize the stock status bar, including changing the battery icon. You can replace it with a circle battery icon, hide the battery icon completely, or display the percentage of battery remaining by selecting ‘Show Battery Text’. 

  • Tweak your battery text
If you do choose to ‘Show Battery Text’, you’ll get access to some additional options that allow you to customize this battery text. You can change the colour of the text, the typeface/font used, and the typeface style by choosing from Italic, Bold or Normal.

  • Edit or hide your clock position
You can change the position of the digital clock that appears towards the right of the status bar. To make this change, tap Clock position and choose from Right, Center or Left. You can also remove the clock completely by tapping Clock position and then Hide.

  • More detailed notifications 
Do your notifications fail to give you enough details at a glance? You can enable the ‘Expand all notifications’ option so that all notifications appear expanded. The Status bar section contains several options, including enabling and disabling Lollipop’s heads-up notifications.

  • Additional options for notifications
When heads-up notifications are enabled, you have additional options. If you have a habit of dismissing notifications and forgetting to act on them, you can enable Ongoing notifications. You can also increase the delay before you can dismiss a notification using ‘Heads up delay.’ 

  • The advanced power menu
If you’re constantly booting into your bootloader or recovery, you can save time by adding these to your power menu. Exit the Status bar and select System from the main. Select Advanced reboot > Reboot options and select Soft reboot, Recovery or Bootloader.

  • More menu options 
There are two other options you can add to your advanced power menu. The first is Enable mobile data where you add an option to turn your mobile data on and off. The second is Quick dial, where you add a telephone number to your power menu.

  • Quick dial shortcut 
To add a quick dial shortcut to a telephone number of your choice, tap Quick dial number and then enter the telephone number. If you want to disable this feature at any point, select Quick dial number again, but this time delete the entire number and tap OK.

  • Improve device’s performance 
Even if you dismiss an app, it can leave processes running which has an impact on performance. Using Wanam, you can kill all processes running in the foreground; just long press your device’s Back button. To activate this functionality, select ‘Long BACK kills process’.


Hide your root access from prying apps

Just because you rooted Android shouldn’t mean you can’t use your favorite app...


 You’ve rooted your phone or tablet and can now enjoy previously unavailable apps and additional functionality. The problem is, some of the apps you were using previously no longer run. In order to maintain the integrity of their products, some app developers opt to disable their apps (or restrict them) if they’re found to be running on a device that has been rooted. If you’ve spent some time trying to get your device rooted (we all know that it isn’t always easy) then this can prove particularly frustrating. To work around this, you will need to fool these apps into thinking that the phone has not been rooted at all and for this you will need RootCloak Plus, which requires the Xposed Framework. While there are other solutions are available (such as the Hide my Root app by Amphoras on Google Play), RootCloak will give you the best results.

Steps to go:- 


  • Ensure Xposed has been updated

Before installing RootCloak, ensure your Xposed Framework is up to date. You need v2.4.1+ with XposedBridge v42+ installed. Open the app, go to Framework> Install/Update to confirm this and wait while the framework updates.

  • Install RootCloak

Next, browse Xposed’s Download section for RootCloak and install by tapping Download. Follow this by rebooting your phone: tap Framework> Reboot. You will now be able to start configuring RootCloak to hide or cloak your root status from certain apps.

  • Problematic apps

The chances are that any apps that are causing you trouble have already been included in RootCloak’s list. This means you don’t need to configure the app! To check, open the app that was complaining about your rooted phone and see if it displays a nag message. 

  • Configure RootCloak

Xposed-compatible apps can be opened from your Android launcher without opening Xposed Framework first. Open RootCloak from the launcher and view the menu. You’ll mostly use Add/Remove Apps for this, but if the app you want to block isn’t listed, tap + to add it.

  • Stop blocked app

If the app you’re trying to run continues to nag you about your phone’s root, it’s likely that you will need to stop it. Open Settings > Apps, find the app in question and tap Force Stop. This will require the app to restart and check permissions before launching

  • Last resort

Using RootCloak should help you persuade root-phobic apps to run, but if this doesn’t work check the Debug log where you should find answers. With persistent issues, run the app in a non-rooted environment, maybe an Android tablet or switch to a more usable app.

Get custom alerts from your Android devices

Set up alerts for everything from sports results to the weather


Even though services such as Google Now offer alerts, they are generally quite limited. The Hooks – Alerts For Everything app offers alerts across more than 100 topics. They are extremely customizable as you can decide whether to be alerted through push notifications or sound alerts and how far ahead of the event you want to be told. Each category has its own range of settings, such as the weather alerts that you can alter depending on the intensity of expected rain. You can manage your alerts within the side menu, as well as selecting your favorites, such as release dates for a movies that you don’t want to miss. You can also share your alerts with your friends, possibly to hint at that film you really want to watch!

Steps to go:-


  • Get hooked
Download Hooks from the Play store and open it up. Your initial homescreen should be a blank white screen with a plus symbol inside a red circle. Tap on the icon to go to the alert screen from which point you can set up your first alerts.

  • Add an alert
The screen shows a of list popular alerts, such as new movies. Tap on the word Add to set up that alert. You can scroll through every app with the All tab and Suggested will later be filled up with alerts related to your list.

  • Find grouped alerts
Scroll down the all list of alerts to find them grouped by category a handy place to v want to set up numerous alerts on a similar topic. Alternatively, you can tap the magnifying glass in the top-right corner to search.

  • Personalize your alert
Tap on the alert that you have set up and it will provide a range of customisable options. Tap on the sliders to decide how you want your alert to arrive, whether as a push notification, a bleep or both. Some alerts have more options. 

  • Check your alerts
Tap the bell icon in the top right-hand corner of the screen and you will be able to see your list of alerts. Tap on any one of them and to take you to that particular alert’s page where you can find more information and see previous alerts.

  • Share your alerts
If any alert appears that you think a friend might be interested in, you can share it via any of the social media channels, such as Facebook, Gmail and Hangouts. This should help you organize events easily with friends that don’t have the app.


YU Power Bank, JYUice launched with 5,000 mAh and 10,000 mAh variants on Snapdeal


YU Jyuice launched for ₹699 ₹599 and ₹1,099 on Snapdeal

YU Jyuice Launches on Snapdeal
YU Jyuice launched for ₹699 and ₹1,099 on Snapdeal

YU has quietly launched a new accessory Jyuice a portable charger or powerbank on Snapdeal in 5,000 mAh and 10,000 mAh capacity. The powerbanks are priced at ₹699 now ₹599 only and ₹1,099 respectively. The launch of the Powerbanks was imminent as reported earlier. This also confirms the company's promise with ever expanding portfolio which already includes smartphones, fitness band health device.

The Powerbanks consists of an Anodized Aluminium Shell which houses a Lithium-Polymer battery with single 5V/2.1A USB port for 5,000 mAh while the larger model has a 5V/1A and a 5V/2.4A USB ports for charging devices. A multi-colored LED light is also present to indicate the power status.

Along with these the circuitry has temperature resistance, short circuit protection, reset mechanism, input over voltage protection, automatic charger protection, protection from output over current, output over voltage protection, and protection from overcharge and over-discharge.

YU Jyuice is available exclusively on Snapdeal here: 5000 mAh and 10,000 mAh.

Buy Now on Snapdeal


Source

YU announces offline service centre in 600+ cities for Yureka, Yuphoria, Yunique, Yutopia


YU Offline Service Center details for Yureka, Yuphoria, Yunique, Yutopia

YU announces offline service centre in 600+ cities for Yureka, Yuphoria, Yunique, Yutopia
YU offline Service Centre
YU has announced the availability of its offline service centers in more than 600+ cities. The offline service center was promised in the #FutureMeetsPast event held on 8th  September, 2015. Today the company took to social media to provide the details regarding the same. The services are now available in more than 600+ cities with 825+ service centers as well as existing door-step service which is now increased to 280+ cities. The service centre facilities are available only for all YU devices i.e. Yureka, Yuphoria, Yunique, Yutopia.

Check out: How to replace or repair Yureka, Yuphoria, Yunique, Yutopia


Before this YU only had an online only service facility which according to Rahul Sharma was because he felt
"If you're buying a phone online then why you should be going to an offline service centre"
however the online service model wasn't that successful because of longer waiting period, delayed support, lack of transit availability and so on. A large group of users were extremely dissatisfied with the online only service. We are sure this new announcement will come as a relief for those customers.

It is worth noticing that the new service centers are nothing but existing Micromax Service Center. However that shouldn't matter much to the users as you can now repair your device offline too.

Here's the list of service centers: YU Service Center List

source

Manually Install CyanogenMod 12.1 on YU Yuphoria


Step by Step guide to manually installing CyanogeMod 12.1 on YU Yuphoria

CyanogenMod 12.1 for YU Yuphoria
CyanogenMod 12.1 for YU Yuphoria 
Update: CyanogenMod 13.0 Android Marshmallow based Nightlies for YU Yuphoria (YU5010, lettuce) available now


Cyanogen Team has announced that it's official Cyanogen OS 12.1 update is in it's final stage of testing but if you're tired of waiting for it's release then you can try CyanogenMod 12.1 from the CM community. A stable release of the of CM 12.1 for YU Yuphoria lettuce is now available.

This blog post will list steps to install CM 12.1 on your YU Yuphoria. In case you aren't aware CyanogenMod is different from Cyanogen OS while the former is developed by community members Cyanogen OS is the official ROM from Cyanogen Team.

[Disclaimer]: Manual installation of ROMs if not performed carefully may result in bricked device. If you're not comfortable with custom ROMs or manual installation we recommend you to get help. YSP Blog cannot be held responsible for bricked device or unexpected results after the installation.

Requirements : Checklist before installing the Custom ROMs


  • Make sure the device is rooted before going ahead with custom ROM installation.
  • The new CyanogenMod CM12.1 [official] Android 5.1 Lollipop custom ROM - has to be installed on the YU Yuphoria aka lettuce model only.
  • Users are advised to pay close attention to the CM release version and check whether the version of their third party installs (kernels, mods, gapps, etc) are compatible with the custom ROM.
  • Installation of custom ROM requires clearing of memory in the smartphone, so make sure to back all the data by installing Clockwork Mod (CWM) Recovery/ TWRP in the smartphone.
  • Make sure to install USB driver in the PC, or else the smartphone (Yuphoria) will not be recognised by the computer.
  • Make sure your device has more than 80% battery, or else there is a chance of the smartphone getting temporarily bricked if the installation process is interrupted midway.


Downloadable Cyanogen CM12.1 (Android 5.1 Lollipop) files:
CM12.1 Custom ROM Snapshot [Stable] for YU Yuphoria (aka lettuce): HERE
[Note:
Build date: 01 September, 2015]
Cyanogen Recovery: HERE
Google Apps: HERE

Tutorial: Step-by-step procedure for installing CyanogenMod (official) CM12.1 Snapshot Android 5.1 Lollipop Custom ROM on YU Yuphoria (aka lettuce) model

Step 1: Download CyanogenMod CM12.1 [Snapshot] Stable custom ROM and connect Yuphoria to PC via USB.
Step 2: Place CyanogenMod CM12.1 ROM zip file into the phone's memory (root-folder only).
[Note: Before users' begin installing the custom software, be sure that the device must be rooted and has installed ClockworkMod Recovery/TWRP tool.]
Step 3: Turn off the device and disconnect from the PC.
Step 4: Enter the Recovery Mode by press holding – 'Volume Up + Volume Down + Power'- buttons.
Step 5: After entering the RECOVERY mode, clear the phone memory, by selecting 'wipe data/factory reset'.
Step 6: Clear the cache memory by choosing 'wipe cache partition'.
Step 7: Go back to ClockworkMod recovery, and select 'advanced' and tap 'wipe dalvik cache'. [optional but recommended]
Step 8: Come back to main recovery screen and then tap 'install zip from SD card'.
Step 9: Tap 'choose zip from sdcard' and go to software ROM .zip file in SD card and enter the installation process.
Step 10: Once done with the installation process, re-start the device by opting 'reboot system now' seen in the recovery menu.
Yuphoria will take a few minutes before rebooting after that if you will have the much awaited CyanogenMod 12.1 on your Yuphoria.

Update: CyanogenMod 13.0 Android Marshmallow based Nightlies for YU Yuphoria (YU5010, lettuce) available now

Source via IBT


Tutorial :- Add Instagram photos to your lockscreen Background

Decorate your lockscreen with an ever-updating collage with Tiles Instagram Lock Screen

 You are now able to customise the look of your lockscreen with photos thanks to the Tiles Instagram Lock Screen app. Installing the free download will transform your standard lockscreen into a tiled feed that is based on your Instagram account. It constantly refreshes in the background, so you get a constantly changing collage of pictures to enjoy. Tiles also enables you to scroll through your Instagram feed without having to unlock your phone or open the app, and you can even Like posts! You can also further fi ne-tune your lockscreen by only showing certain accounts in your feed and choosing a background colour.

Special Features :- 


  • Collage layout
Pressing the power button on your device, will now bring up a tiled list of the last 15 or so pictures that would normally appear on your Instagram feed. Some are miniaturized while others are large for interest and a sense of variety.

  • Access Instagram
Tapping anywhere on the screen, other than the red rectangle, padlock or camera icon, will unlock the Instagram feed. This will let you scroll through your feed without unlocking your phone, which is pretty handy. If your phone’s unlocked, tapping on an image will enlarge it to fill the whole screen.

  • Still secure
Swiping upwards will reveal your normal lockscreen underneath. This means if you normally use a PIN, password or pattern-based lockscreen, your phone security isn’t compromised beyond being able to access your Instagram account without unlocking.

  • Revert to normal
If you tap the triple-dot icon, you can access Tile’s settings from the lockscreen and quickly remove the Instagram feed, reverting to it your default lockscreen.

  • Currently no camera
While you’re supposed to be able to instantly open your camera by swiping, we found this feature didn’t work on any of the phone’s we tried Tiles on and neither did the camera button in the bottom right. Hopefully, this bug will be fixed soon.

Instagram Connectivity:- 

Beyond providing a constant feed, Tiles has several other features you can use without unlocking your Android


  • Like and comment 
Tap on an image in the feeded and it will expand to fill your screen. Not only will you now have an expanded view of the picture, you will also be able to like, comment and read the captions.

  • Tiles settings
If you open the app, you will be greeted with a settings screen. From here, you will be able to change the colour of the theme and make it update only when you have access to Wi-Fi to save on your data allowance.

  • Hide unwanted posts 
If there is someone you follow whose pictures you do not want to appear on your lockscreen for some reason, you can change this by tapping No Symbol situated to the right of your screen.


Enjoy It!!!

Hide your apps and keep your photos private

If your phone is stolen, your personal details don’t have to be an open book


Over the page we’ll look at encryption, but simply locking apps and hiding stuff that you want to keep secret is enough to protect sensitive information from most people. Apps Lock and Gallery Hider enables you to choose what you want to lock or hide so that It's only available to you or to someone with the correct password or pattern signature. It also offers encryption for photos and videos. This handy app is useful for more than just protecting you from the aftermath of a theft. You don’t have to be obsessive to keep secrets from your colleagues, friends and family. On occasions you might let them use your phone so you can’t lock it entirely, but this way you decide what they have access to. And by hiding the Settings app, you can prevent your kids from playing with your phone and messing things up.

Steps:-


  • Install and setup
Install Apps Lock and Gallery Hider. When it first runs, it’ll prompt you to create a lock profile. Choose a password, pattern or voice recognition, give the answer to a secret question and provide your email address for password recovery.

  • Configure your options
Although the app will work with the default options, you might want to configure it according to your preferences. Using the Lock Manager and Lock Control tabs, change any of the settings, for example, hiding your password as you enter it.

  • The main menu
Having setup your unlocking method and options, press back to go to the main menu. There are some additional options here that you might like to investigate later, but mostly you’ll be using the Apps Lock and Gallery Hider functions.

  • Lock your apps
From the menu, select Apps Lock and agree to install Mig Central Server if asked. Some apps are locked; touch the padlock icon to lock others. When you try to run a locked app, enter your password, pattern or speak to continue.

  • Hide images or videos
From the menu, select Gallery Hider. Click Photos or Videos; choose folders or items you want to conceal before selecting Hide. To reveal them later, select the Hidden tab, then choose what you want to uncover before selecting Unhide. 


Step by Step Buying Guide for YU Yunique from Snapdeal

How to buy YU Yunique from Snapdeal

Buying Guide YU Yunique

Update: YU Yunique (YU4711) is now available without any registration on both Snapdeal as well as Amazon India along with some selected local store.


On 8th September in the #FutureMeetsPast event YU unveiled it's ultra affordable smartphone YU Yunique which the company claimed to be the cheapest HD smartphone with 4G capabilities. The initial reactions to Yunique has been very positive from both the general audience as well as tech bloggers.
As has been the case with all YU smartphones Yunique will be available on a pre-registration basis flash sale. The sales model which is both popular as well as controversial. Also this time around YU has partnered with Snapdeal instead of Amazon India for delivery of it's fourth and the newest device.

The change in shopping partner has brought about changes in the entire buying procedure. The flash sale on Snapdeal is quite different from Amazon India. This post is aimed at explaining each step in detail for potential customers of YU Yunique.

Steps to Registration for YU Yunique


a) To participate in the sale you need a Snapdeal account, so if you don't have one please create a new Snapdeal account and if you have one kindly login into your account


b) Go to YU Yunique registration page: Registration Page

Register YU Yunique
Registration Page


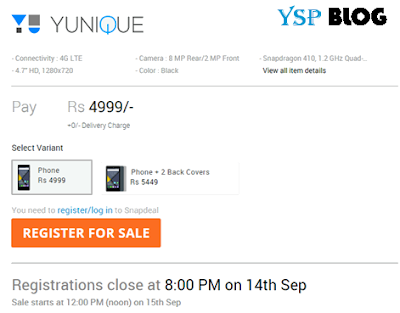
 You will see something like the above image. Click on register for sale.

c) After the click you will get something like this

Address Details
Fill Address details


Kindly fill in your address on which you would like your Yunique to be delivered and click done.

Please note that address you enter will be permanent and cannot be changed later on. If you do buy Yunique in the sale it will be delivered to this address only. So make sure to enter your genuine address.

d)  Your registration is complete now. You will get a confirmation like this and a notification email about your registrations.

Registration Confirmation

Steps to Buy YU Yunique from Snapdeal

a) On the day of sale i.e. 15th September make sure you're logged into your Snapdeal account at least 10 minutes before the sale as a limited stocks will be available on the first sale.


b) At 12 PM you'll see the option to add the product on the cart. Select the appropriate variant i.e. with or without covers and click Buy Now to move to confirmation page
c) Complete Order: Hit 'Confirm Order' to complete booking

And you're done. Wait for the courier to deliver your Yunique.

Hope this guide helps you in understanding the procedure of buying YU Yunique from Snapdeal. If you think we missed anything or you'd like any additional information feel free to comment below.

Checkout: YU Yunique Complete Specifications


Update: YU Yunique (YU4711) is now available without any registration on both Snapdeal as well as Amazon India along with some selected local store.


YU Yunique Price, Specifications and Availability


YU Yunique Complete Specifications

YU Yunique Specifications and Price
YU Yunique at a Glance
YU Yunique now available without registrations now.
Buy now on Snapdeal

Operating System
Android Lollipop 5.1 with an option to run Cyanogen OS 12.1
System Architecture/Processor
Qualcomm® SnapdragonTM 410 (MSM8916) processor with
1.2 GHz, 64-bit quad-core CPU, Adreno 306 GPU
RAM
1 GB DDR3 
Storage
8 GB internal, removable storage supports up to 28 GB microSD card (sold separately)
Dimensions
134.5*67.5*8.3 mm
Weight
128 grams
Display
11.94 (4.7"), HD Display (1280x720),
Corning® Gorilla(TM) Glass 3, Oleophobic Coating
Battery*
2000 mAH
Stand-by : 271 Hours, Talk time : 7 Hours 
Networks and Bands
LTE (4G Bands: TDD: 2300MHz(Band 40), FDD: 1800MHz (Band 3))
UMTS/HSPA+ (3G Bands: 900/2100MHz)
GSM/GPRS/EDGE (2G Bands: 900/1800/1900/850 MHz) 
Rear Camera
8 MP AF Rear Single-LED (single tone) flash
with Geo-tagging, Face detection, HDR, Panorama, Live filters
Front Camera
2MP FF, HDR, 1.75um, wide FOV83, 3P lens F2.4,
SIM Card
Dual Sim (Micro SIM), 4G supported on both sim  
Connectivity
Micro USB, 3.5mm headset jack, USB Host (OTG Support)
Bluetooth® Technology
Bluetooth version 4.0 LE
Wi-Fi
802.11 b/g/n (2.4 GHz)
Video Capture
1080p HD video, 30 fps
Sensors
Accelerometer, Proximity, Ambient Light
Location
GPS with A-GPS, GLONASS
Base color
Black
Price
₹ 4,999
Availabilty
Yunique will be available every Tuesday at 12 PM exclusively on Snapdeal through Flash Sale starting 15th September, 2015.

YU Yunique available without registration:  Buy Now on Snapdeal

Step by Step Buying Guide for YU Yunique from Snapdeal

Source

Now Get Dolby-quality sound on your device

Boost your Android smartphone or tablet’s audio quality with this Dolby Digital Plus mod


If you regularly use your Android device to listen to music or watch movies, then you may have noticed the sound quality on smartphones and tablets isn’t always the best. 
one way of improving your audio is to install Dolby Digital Plus. This is a Software pack that includes Various sound profiles, which all boost your devices audio quality in different ways. For example, the voice profile detects and improves dialogue, which is handy if you’re listening to an audiobook. You can also create your own profiles to suit the specifics of your audio.
Thanks to a recent mod, Dolby Digital Plus is now compatible with more android devices than before. In fact, this mod should be compatible with any deodexed Lollipop ROM. If you’re unfamiliar with dodexed and odexed ROMs, stock and manufacturer ROMs are generally odexed, whereas custom ROMs tend to be deodexed. Before attempting this hack, it’s definitely worth checking the XDA Developer thread as it includes a list of devices that Dolby Digital Plus is known to be compatible with (http://goo.gl/82ASo9). This hack does require a rooted device with a custom
reovery installed. Depending on your device, you may also need to flash a particular ROM. Again, the XDA Developer thread has all the details, so before you start be sure to have a good look at this thread and flash a custom ROM if necessary.

Steps to go Dolby Digital Plus:-


  • Check available space

To install Dolby Digital Plus successfully, you need at least 25MB of free space. To check how much space you have available, open your device’s Settings and select Storage. If you have less than 25MB, you’ll need to make some room before moving onto the next step.

  • Flash Dolby Digital Plus

Download the Dolby Digital Plus ZIP from https://goo.gl/VemEkv. Place this file somewhere accessible on your device, then boot into your custom recovery. Flash the Dolby ZIP, then wipe the cache partition. Open the Advanced menu and select Wipe Dalvik Cache. Reboot.

  • Try switching profiles

Open your app drawer and launch the Dolby app. You’ll see a selection of default profiles that you can switch between. Try selecting a new profile. At this point, the app may crash. If it does, there are a number of things you can do to try and get it working, so don’t worry.

  • Disable Awesome Player 

Go to Settings and open Developer Options. If you don’t see Developer Options in your menu, go to About Phone and tap Build Number until you see a message ‘You are now a developer.’ In Developer Options, find Use AwesomePlayer and make sure the slider is set to Off.

  • Nexus 5 users 

If you’re using a Nexus 5, you disable direct volume control using the Poweramp app. Head over to Google Play and download Poweramp (£3/$3.99 but there is a free version). Launch Poweramp, tap the menu icon, select Settings>Audio>Advanced Tweaks. Disable Direct Volume Control.
  • Download SELinux 

If you find that Dolby is still force closing, the problem could be that SELinux is set to Enforcing mode on your device. To switch SELinux to permissive mode, download the SELinuxModeChanger.apk from http://goo.gl/CSywwe. It’s best to use a file explorer to navigate to this APK, and then give it a tap.

  • Make the switch

When prompted, tap Install. Open your app drawer and launch the SELinuxModeChanger app. Tap the Permissive button. Relaunch the Dolby Digital Plus app and try switching profiles – it should no longer force close. You can now switch profiles to suit whatever you’re doing on your device. 

  • Edit Dolby profiles

You can edit the default profiles by double-tapping them. Alternatively, create your own by double-tapping Custom 1 or Custom 2. Whether you’re editing a default profile or creating a new one, you get access to the same three sliders, which you can toggle on or off. 

  • Levelers and enhancers

Volume Leveler monitors the audio and makes adjustments to keep the volume at a consistent level across different content and applications. Dialogue Enhancer monitors audio for dialogue, and applies processing to improve the intelligibility of the spoken portion.

  • Disable Dolby Digital 

The final switch, Sound Visualizer, brings a surround sound effect to your device. Once you’re happy with your profiles, return to the main Dolby screen. If you ever want to stop using the Dolby app, you can do so here, by tapping the power button in the upper-left corner.